tiistai 10. syyskuuta 2013

"Plain Jane" day dress and a simple poke bonnet

Two days to go before this year's Jane Austen Festival. Two! I'm travelling over on this Friday and apart from small, last minute sprucing up to be done on some gowns, my wardrobe for the week is ready. I think. Maybe.
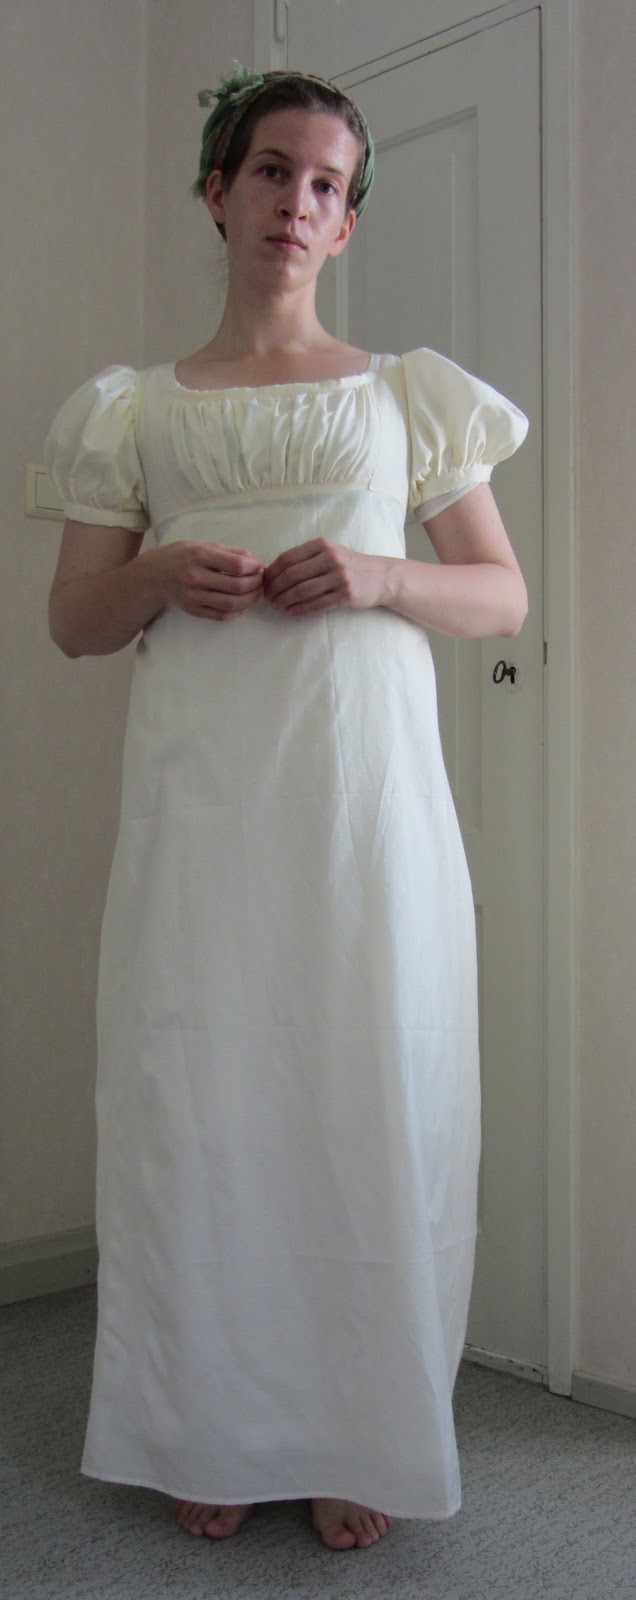
I pushed myself to finish a plain day gown during the weekend, just something very simple that can be worn with all the spencers, chemisettes and on its own, too. The gown pattern was yet another variation of my basic bodice and hem patterns and I especially like the slim silhouette of the front of the dress. This is actually the only Regency gown I've made with actual puff sleeves. The fabric is possibly viscose or some other cotton blend, it was a lucky and cheap find in a fabric shop closing sale. The colour is much creamier than what the photos show and the fabric has small rectangular spots woven in.

Trying the dress on with the 1790s red spencer and the Shetland lace shawl I knitted a couple of years ago.


Close-up of the fabric, the colour doesn't really photograph right

Big Regency puff sleeve

The green stays and the top edge of the petticoat show through the dress. I have to wear the old white stays with the white gowns and one last project I need to whip up is a bodiced petticoat.

    
The two middle buttons close too, but I couldn't bend my arm that far and there were no ladies maids handy.


I also finished another hat project; I've talked about the merits of paper yarn in hat making before but this time I really think that the result is exactly what I wanted. I don't know what the situation is elsewhere, but here in Finland paper yarn in several colours and thicknesses is a crafts shop staple. I guess people mostly use it in weaving tapestries, rugs and tablerunners and the like, but it is really a very versatile material, being durable but pliant, and definitely more easily attainable than for example straw.

For my poke bonnet I used 200 grams of 0.8 paper yarn (by Lappajärven värjäämö) and a size 5 (European) crochet hook. The pattern is my own. First pictures, then the pattern :)

I think I look pretty silly wearing bonnets :)


I added wire to the brim to keep it in shape    


Poke bonnet pattern

200g paper yarn ( I used the 0.8 variety, using different thickness means that you need more/less of the yarn)
Size 5 (metric sizes) crochet hook (the hook can be quite large, otherwise crocheting this stiff material is rather difficult and the result will look uneven)
Thin wire for the brim (without wire support the brim wants to curl from the edges so this is a must!)


 Abbreviations (I decided to use the US crochet abbreviations):

st - stitch
sc - single crochet
cs - chain stitch
dc - double crochet

Make beginning loop and croched 2 cs.
1. Crochet 8 sc on the beginning loop. Do not close the round but continue to crochet as a spiral (here would be a good place to mark the beginning of the round so that it's easier to keep track of the increases on each round)
2. Crochet 2 sc on each st of the previous round. 16 st.
3. *Crochet 1 sc, crochet 2 sc on the next stitch* Repeat *-* all the way to the end of the round. 24 st.
4. *Crochet 2 sc, crochet 2 sc on the next stitch* Repeat *-* all the way to the end of the round. 32 st.
5. *Crochet 3 sc, crochet 2 sc on the next stitch* Repeat *-* all the way to the end of the round. 40 st.
6. *Crochet 4 sc, crochet 2 sc on the next stitch* Repeat *-* all the way to the end of the round. 48 st.
7. *Crochet 5 sc, crochet 2 sc on the next stitch* Repeat *-* all the way to the end of the round. 56 st.
8. *Crochet 6 sc, crochet 2 sc on the next stitch* Repeat *-* all the way to the end of the round. 64 st.

You should now have a circular piece about 15 cm in diametre.

Still working in spiral, crochet 10 rounds  of sc without increases.

19. *Crochet 2 sc on the next stitch, crochet 7 sc* Repeat *-* all the way to the end of the round. 72 st.

Crochet 9 rounds of sc without increases.

 If you want/need to make the crown of the bonnet bigger or longer you should make more increase rounds and/or add more rounds without increases in between. Just make sure that the increases are even and aren't made right after one another; spread them out! The crown should be long enough to accommodate a bun hairdo.

NOTE! Remember to strech and pull out the weave as you make the hat; because you're working with paper yarn that does not stretch on its own like wool would, the hat needs to be pulled into shape every now and then while working it. This is really not that clear when explained, but if you try to crochet paper yarn, you'll see what I mean :)

The brim begins here; it is worked by crocheting back and forth.

29. Crochet with no increases until there are 18 st left of the round. Crochet 2 cs and turn work. 
30. Crochet 2 cs on the 1st "sc" of the round, crochet 7 sc, then 2 sc on the next stitch. *Crochet 8 sc, then 2 sc on the next stitch.* Repeat *-* all the way to the end of the round. Turn work.
31. Crochet 2 cs (1st stitch of the round), crochet sc all the way to the end without increases. Turn work.
32. Crochet 2 cs (1st stitch of the round), crochet 8 sc, then 2 sc on the next stitch. *Crochet 8 sc, then 2 sc on the next stitch.* Repeat *-* all the way to the end of the round. Turn work.
33. Like round 31.

Make 3 more rounds with increases, always adding one stitch more between the increases (10, 11, 12). After an increase round there's always a round without increases, so altogether you need to crochet 6 more rounds.

After completing the 6 rounds described above, crochet one more round without increases.

The lacy gingerbread edging on the brim is optional. This is how you make it:

In the corner of the brim, crochet 3 cs and connect it with a slip stitch on the short edge of the brim. This is the first double crochet. Make 8 more double crochets on the same corner stitch, *jump over 2 stiches on the brim, crochet 1 sc, jump over 2 stitches on the brim, make 6 double crochets on the next stitch*, then repeat *-* until you've reached the other corner of the brim. Then make trebles on that corner like you made the first, connecting the last double crochet of the group of 9 with a slip stitch on the short edge of the brim. Cut off yarn and weave in the ends.

Finally, add wire to support the brim and to keep it in shape. Because the brim is worked back and forth, it wants to curl in different directions on the corners, so wire is definitely needed. You can insert the wire after you've finished the bonnet, or crochet it in while you're making the brim.

That's it! I will probably add this pattern to Ravelry as well.


torstai 5. syyskuuta 2013

Robe à l'Anglaise retroussée & the frilly petticoat

The Jane Austen Festival and my trip to Bath are just a week away and I really should be putting finishing touches to my Regency wardrobe, but I couldn't resist sewing the striped anglaise. I even managed to find fabric for a petticoat, though at first it seemed a bit hopeless.

I made the anglaise after  Costume Close-up pattern and as it is my first proper anglaise gown with en fourreau back, I'm rather pleased with it. I'd like to fix the gaping front edges, but other than that, the gown is comfortable, fits well and I'm even beginning to get over that it does look rather pink. Everything is handsewn.

The petticoat is yet another ordinary petticoat, only this time I added a frill on the hem and made the skirt slightly shorter than usual because that looks good with the hem pulled up. I chose to machine sew the petticoat because the fabric (cotton with some sort of finish to make it slightly shiny) was very thightly woven and handsewing it felt like too much of an effort. Besides, sewing petticoats is boring, boring, boring. AND I had to hem not only the skirt itself but also the frill (ca. 6m in lenght) on both edges. Somehow that didn't  sound too appealing.

I'm hoping to wear this ensemble at a little ball at the end of September after I've returned from Bath.


I'm not sure if I should add some bows or ribbons


I really like the way that the petticoat looks here


Posing with the harp

perjantai 23. elokuuta 2013

Eye candy for 1920s fashion fans

I recently had a chance to see couple of episodes of an Australian TV series "Miss Fisher's Murder Mysteries", in which the Honorable (and sassy) Phryne Fisher solves murders and crimes in the 1920s Melbourne, Australia. The series is based on Kerry Greenwood's Phryne Fisher Murder Mystery novels.
Although I've never been much of a fan of crime series or novels, I confess that I do like Agatha Christie's Hercule Poirot and Miss Marple both on the page and on TV. Miss Fisher is of the similar stock, but with a slightly lighter and fashionable twist. I think the episodes are well written and the set design and the costumes are true to the period.


http://blogs.abc.net.au/.a/6a00e0097e4e6888330167659f6abb970b-pi    

http://ctchannel.files.wordpress.com/2012/04/miss-fisher9.jpg

Pictures from the ABC TV web site, no copyright infringement intended.

It's strange, really, the 20s fashion seems to be an acquired taste; I didn't really use to like it before (except the hats and the shoes), but now after a lot of exposure I've begun to see what's so great about the twenties style. I still adore the hats and the shoes, and the gorgeous fabrics and embroideries are another thin.

So, if you have a chance, I recommend  Miss Fisher, even if it's only for the fabulous clothes :)


sunnuntai 18. elokuuta 2013

Bath, are you ready?

Let's begin with a massive beret. I finally found fabric for (unintentional alliteration, I better stop before it gets ridiculous...) a beret (phew!) that matches the pelisse. When I say matches, I don't mean it's exactly the same colour or even purple because that's just too matchy-matchy for my taste. That's what always bothered me with the bicorn hat, it's purpleness and too closely matching colour. So, a long story short, I found nice rosy satin, not too shiny or artificial looking and the colour looks very nice with the pelisse.
The beret has no particular pattern, I cut a circular piece, ca. 60cm in diameter, a headband that fits my head, pleated and sewed the beret piece on the headband, added lining, and folded the headband lenghtwise and sewed the edge. The feathers aren't sewn on, because I use them with other hats and headwear as well. Some photos of the whole get-up:


I have to adjust the feathers, they're not drooping the way I intended.


I kind of like the chemisette with the collar open like this as well

 There's my promenade costume all finished; can't believe that the Jane Austen Festival is less than a month away!

I've also been sewing some 18th century things. This was my first attempt at robe à l'Anglaise and at first it seemed that I had managed to fail spectacularly at it. I had cut the back too  long but luckily I was able to shorten it from the neck edge and now it looks the way it should. I still need to attach the sleeves and the trimming but the biggest part of it is done.
The pattern for the gown came from the Costume Close-Up by Linda Baumgarten. You know, the pink Williamsburg anglaise. I followed the pattern and the instructions quite closely and I like the result.
Note, this is NOT a pink gown. When I started sewing historical clothes I swore that I'd never make anything pink because that's just too cute and girly and just not my thing. I don't wear pink, period. So this gown, however it may appear, is not pink. the fabric has narrow red and white stripes and this makes it look, well, pink. But it's not :)

I want to make a white petticoat to go with this gown.

I really like the polonaise effect here. There are tapes on the inside of the skirt which are tied together to lift the hem.


See? Not pink.


Who am I kidding. It's pink. :P
 

lauantai 10. elokuuta 2013

An event post!

Today I had a chance to go to an actual event, and not 40km from where I live! I had a lovely day at the 18th century fair in Isokyrö, thanks to lovely musicians of the old music band Muskotti, fabulous costumers and re-enactors from Tampere and a campful of assorted soldiers. The pictures aren't that fantastic, but there was music, dancing and just perfect weather and beautiful scenery. There was a big battle between Sweden (Finland belonged to Sweden at the time) and Russia during the Great Northern war (1700-1721) and that's why they have the fair in Isokyrö.

Thus endeth the history lecture. Some pictures below.

Old music band Muskotti

This little girl went around the fair ground on stilts hour after hour

Assorted soldiers doing  demo with cannons


There was a big BANG and then smoke


Kyrö River

In the stocks

Fair grounds and the old Medieval church of Isokyrö, from ca. 1513


Picnicing

Tarot reading

Me at the church door

The clothes were very comfortable, even the new chinoiserie stays held up very nicely. The jacket is my version of the Swallow tail jacket and I made the cap yesterday

There were many 19th century graves in the church garden

The soldiers' funny hats


Muskotti playing dance tunes for us


The stays after I took them off tonight :)