Today I went out to a nearby park with an obliging friend to take some pictures of the epic pelisse I finally finished this week. This was the biggest sewing project I've made so far, and the result pleases me very much.
I saw the
the fabulous 1820s pelisse in the Museum of London last September and was instantly smitten. Here was a garment that needed to be reproduced! I begun the project in late February this year and now it's finished. In retrospect, it didn't really take that long; I had other projects in the making at the same time, so maybe if I had only been sewing the pelisse, it would've been ready earlier.
The coat pattern itself is not that complicated, I used my trusty Regency bodice pattern and took the hem pattern from Jean Hunnisett's book; it actually is the 1820s hem pattern, so the shape is very similar (at least to me) as with the original. I think I might have made the bodice a little bit longer, as the waistline begun to creep downwards again in the 1820s, but it works like it is, too.
I drafted the petal sleeves and the collar myself, and I'm especially pleased with how the collar turned out. It's so pretty! For the sleeves I used my standard Regency sleeve pattern and added the slightly flared cuffs.
The most time-consuming bit of the entire project was obviously all the trimming and the beading. I made the rouleaux piping out of the pelisse fabric; I just cut about 2,5cm wide strips of the cloth on the bias, sewed the short ends together and then machine stitched the long sides together. I then turned the tubes right side out and pinned and handsewed them on the pelisse. The coat is entirely handsewn, I only used the machine when I made the piping, because... well, it's pretty obvious why!
I drew the leaf motifs and the beading patterns on tissue paper and pinned them on the coat and then sewed the piping and the beads on. When I was finished I just ripped off the paper. This way, the piping and the beading came out very even and it was tons easier to manage the symmetry and the mirroring patterns on the front edges. I actually use the tissue paper trick pretty much always when I embroider, I find it works very well and I don't have to trace the patterns on the fabrics.
The pelisse has 140 grams of glass beads on it and - I would guess - about 30 metres of rouleaux piping.
Want to see what it looks like?
All outdoors pictures by Suvi Saraste, construction photos by me.
 |
| The pelisse and the belt have hooks and eyes closing |
 |
| The original pelisse had the leaf trimming on the shoulders as well but I chose to have just the two repeats of the pattern. |
 |
| I wore the fern dress underneath |
I also made a little bicorn hat to go with the coat. I made the massive red bonnet earlier, but somehow that doesn't look right with the pelisse. I might make a big turban hat later, those seem to be very popular in the 1820s fashion plates.
The bicorn came about when I was watching the 1995 Pride and Prejudice for the umpteenth time; I noticed that Mrs. Hurst (Mr. Bingley's married sister) wears a jaunty little bicorn whenever she's out and about. Inspiration! I had a couple of those floppy 70s-esque felt hats lying around, one black and one plum, I had bought them with 1 euro apiece and hadn't really done anything with them. But now!
I don't know how period accurate the bicorn really is, especially on ladies, but at least they were around at the time and soldiers and even civilian men wore them. And anyway, women's Regency fashion took a lot of influences from the military uniforms of the time. You could even say that the Museum of London pelisse has the sort of military cord trimming going on, only the cords have been arranged in nice, feminine leafy patterns.
There are some construction photos of the hat further down.
The hair was a problem, as ever. You'd think that Regency dos would be easy, but I think that nonchalant "I just whipped my hair up in a bun like this, and doesn't it look cool and simple and nicely curled" style is difficult to achieve. My hair is wavy and curls very easily, but making a nice bun with some pretty curls around my face just never works out the way I'd want. Meh. Got to keep on practicing.
So, how did I make the pelisse? Luckily, I did take a lot of photos.
 |
| Beading the back piece, I attached all the beads one by one. I found that that way the beading was more stabile and it was faster and easier than attaching a long string of beads. |
 |
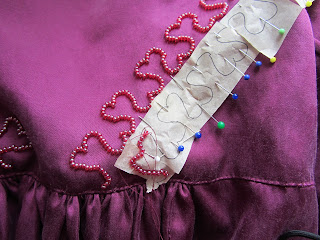
| Attaching the rouleaux piping. Having the paper pattern really helped with the symmetry. |
 |
| I don't know how the piping was attached in the original pelisse but I chose to sew through the piping in tiny stitches. |
 |
| I also added a cord piping to the front edges to support them and keep them straight. |
 |
| After finishing the trimming and the beading I added facing pieces to cover up all the stitching on the inside of the coat. |
 |
| An extra piece added under the hooks and eyes to conceal any gaping between the front edges |
A couple of photos of the hat:
 |
| A floppy felt hat + trimming. |


